APEX 460 TO C12 DIY MOD
DO IT YOURSELF INSTRUCTIONS
Introduction -
There is something magical about condenser mics that defies explanation. It’s no wonder why some people have huge mic lockers and I find myself beginning down that path. Condenser mics are one of the coolest inventions ever. What makes a good condenser mic is part science and part mechanical alchemist. A mic with a perfect frequency response doesn’t necessarily sound all that good. There is a element to these devices that is pure art, and I like that.
I have somewhat of an electrical engineering background. My father was an engineer and I spent countless hours building stuff and learning as I grew up. Oh, if I only had the stuff now that I used to tinker with in the 70‘s! I also did a college stint in electrical engineering, but ultimately decided not to follow in my father’s footsteps as a career, though I did spend a couple of years as a bench tech. I recently started modding mics for fun, to dust off skills I hadn't used in over 25 years, and am now expanding into other areas.
A project like this is not for the beginner. You should have good soldering skills and a sense of what a schematic means in case you get into trouble. This project is more for the tinkerer or die hard enthusiast, or for someone who has a couple of simple mods under their belt and wants to move to something more challenging.
One of the biggest things I gained from doing this particular project is a new found awe and respect for the folks that do this type of stuff for a living. For starters - ITS REALLY FREAKING INTRICATE WORK. The concept seems rather simple but its meticulous work when you get down to it, and only certain types of people can do that long term consistently with any regular speed. (I know - I used to fix hearing-aids while working my way through college and couldn't hack it with all the little delicate parts day to day - though a college buddy of mine still does that to this day) I figured after spending $500 plus on parts if I had to charge an hourly rate at what it took me to do this project, I’d clearly be better off simply just buying a boutique mic from JJ audio or Advanced Audio Microphones or Peluso or Oktavamod, or such.
However there is something totally cool about having a mic or two in your locker that you actually built yourself, especially if its something that sounds really special (this one is my 4th actual completed mod). This particular mod can create one of those mics, and I hope to take some of the guesswork out of the process here for other people who may want to do the same.
Mark
I. Credit Where Credit is Due -
I’d like to thank all the people that helped me out. While I set out to do this on my own, I gained input and knowledge from many different people and could not have made this the success it was without all the help. So I’d like to thank -
Jim Jacobsen - JJ Audio http://www.jjaudiomic.com/ for schematic help and providing a few key component values.
Dave - Advanced Audio Microphones. http://www.aamicrophones.com/ For the C-12 type capsule
Christian "Bowie" Whitmore (ProAudioTubes@aol.com), provided specially selected, low-noise, microphone-grade NOS tube.
David Geren @ Cinemag http://www.cinemag.biz/ for help selecting the high quality transformer.
Fellow Gearslutzers - Mista Min ( for the alternate C24 doc that helped me verify final circuitry ), Kidvybes, Idylldon, theBF, BudgetMC, and anyone else I may have forgot my apologies, Thanks for the links and info !
II.Parts List - You Will Need
When I can I’ll list where i got my parts and hopefully the links will be good for a while. This doesn't mean these are the best choices you could possibly make, its simply what I used based upon the input I had at the time, and I am happy with the results.
1-Apex 460 - http://www.frontendaudio.com/APEX-APEX460-Large-Diaphragm-Studio-Microphone-p/7493.htm
1 - C12 type Capsule - http://advancedaudio.ca/collections/diy/products/ak12-capsule I used the AK-12 C12 type capsule, or you can use a Peluso CEK12. UPDATE 20131108 - Microphone Parts also has a good alternative http://microphone-parts.com/rk12-microphone-capsule/ and if you want a higher end capsule there is now this alternative - http://www.frontendaudio.com/ADK-GK-251d-p/9999-10333.htm
1 - 1000pf Polystyrene capacitor http://www.newark.com/lcr-components/fsc-160v-1000pf-2-5/capacitor-polystyrene-1000pf-160v/dp/82K9245
2 - 4700pf Silver Mica capacitors http://www.hndme.com/productcart/pc/viewPrd.asp?idproduct=511&idcategory=25 I had metalized film slated here but they averaged 10% tolerance at this value and the silver micas are 1% tolerance. So I switched to the silver mica. A polystyrene in this location would be good as well - the Silver Micas at this value are getting hard to find, or rather expensive.
1 - 47uf 25v - 63v electrolytic Nichion Muse or similar audio cap. I used a 100v Elna simply because I happened to already have one. http://www.hndme.com/productcart/pc/viewCategories.asp?idCategory=76 Update - user reports indicate that most folks prefer the Elna over the Nichion for this application.
1 - 1uf 250V Metal FIlm capacitor of Audio Quality - I used a 3% tolerance Pulse X cap from www.erseaudio.com but Realcaps, Mundorf and many other Audio caps are good too. Update - I recently had a chance to compare the Mundorf caps against the Erse. The Erse had a more pronounced bottom end and was more overall rounded… a nice classic vibe to it. The Mundorf had a bit of "air" to the top end and it and was sharper, overall more transparent in my opinion.
1 - 1.8K 1/2watt resistor ( in most cases avoid carbon based types because of noise ) - so I used a metalized type.
1 - Cinemag CM-2480 Transformer from www.cinemag.biz
NOTE - the Cinemags are made to order so it takes a while to get one - like up to 2-3 weeks. The wait is worth it and they are a work of art unto themselves. Very high build quality.
1- 6072 NOS Vacuum tube. The type an quality of the tube can greatly affect sound. As NOS tubes become more and more picked through ( and over time - more expensive ) , I highly recommend using someone who can properly test and assess the tube for you. I used Christian "Bowie" Whitmore (ProAudioTubes@aol.com) and he was great to work with and we had several informative back and forth discussions on tube types and the sound I was looking for, definitely a cut above the Click-and-Pray methods I had used in the past at various on-line sites. For this project I chose a 1964 GE 6072A black plate.
Heatshrink tubing 1/32” or 1/16” - better than electrical tape. ( and something to heat it with )
III. Tools -
Soldering station and solder - Something with a stand - I dropped an iron recently in the studio and burnt a cable - the new station was less than the cable, just get one.
Solder Sucker - These are cheap and essential for quickly sicking out the solder you don't want when removing old parts. Suck the old out .. new parts go right in with no fuss.
Appropriate screw drivers and needle-nose pliers for holding things.
Tray for holding screws
(optional) Good Scotch or other appropriate spirits. I find a sip or two makes it a bit smoother/easier and less cramping when working on small parts with my big hands. Not too much though !
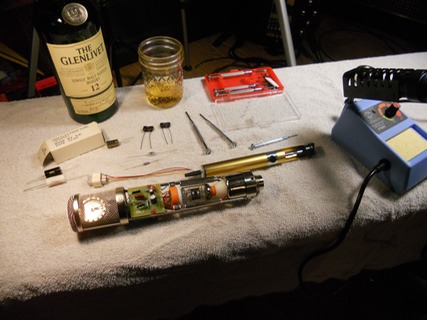
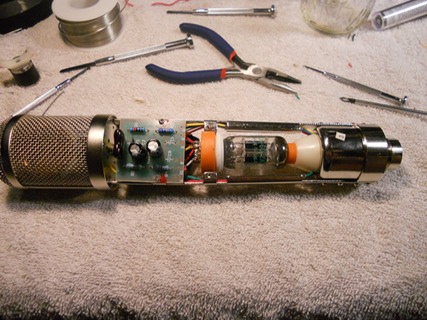
Pix - All set up and ready to begin - Click for full size
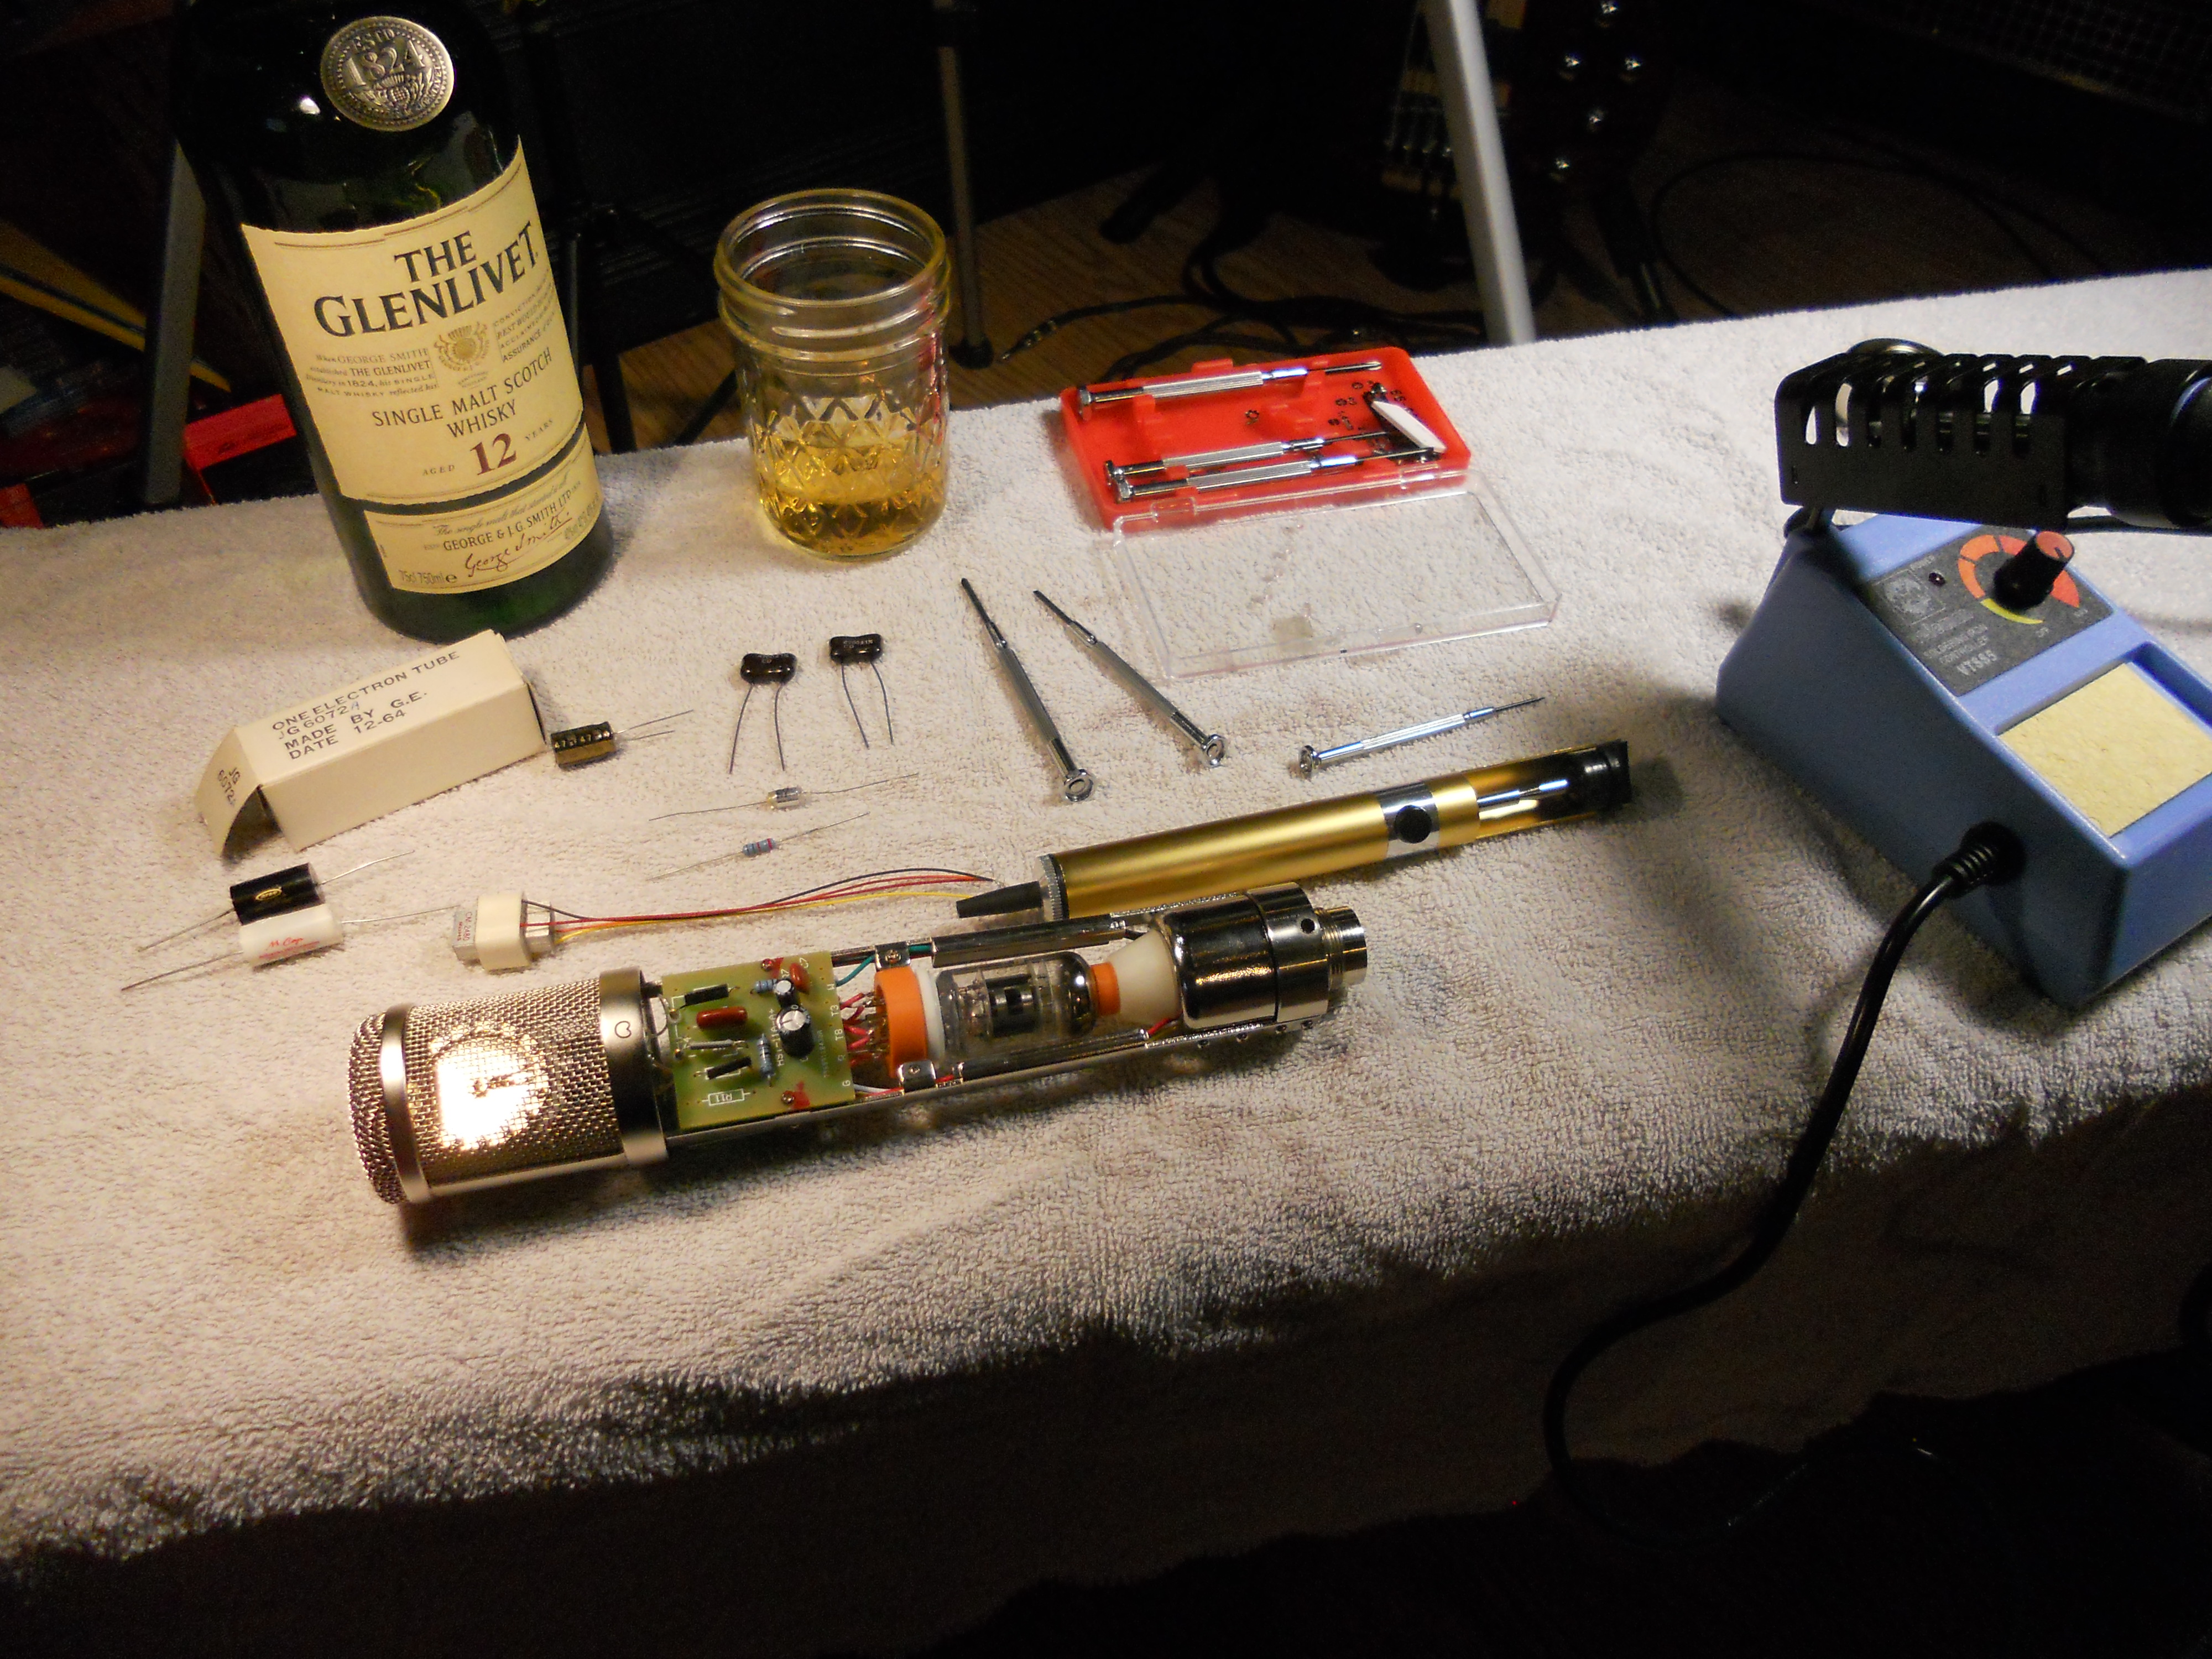
IV. The Schematics -
Before ( the existing stock Apex 460 ) This is off the Apex web site, so hopefully the link stays put. http://www.apexelectronics.com/files/products/Apex460/Apex460-sm.pdf
After ( your target configuration ) http://www.mark-o-matic.com/media/apex460-c12-mod.jpg
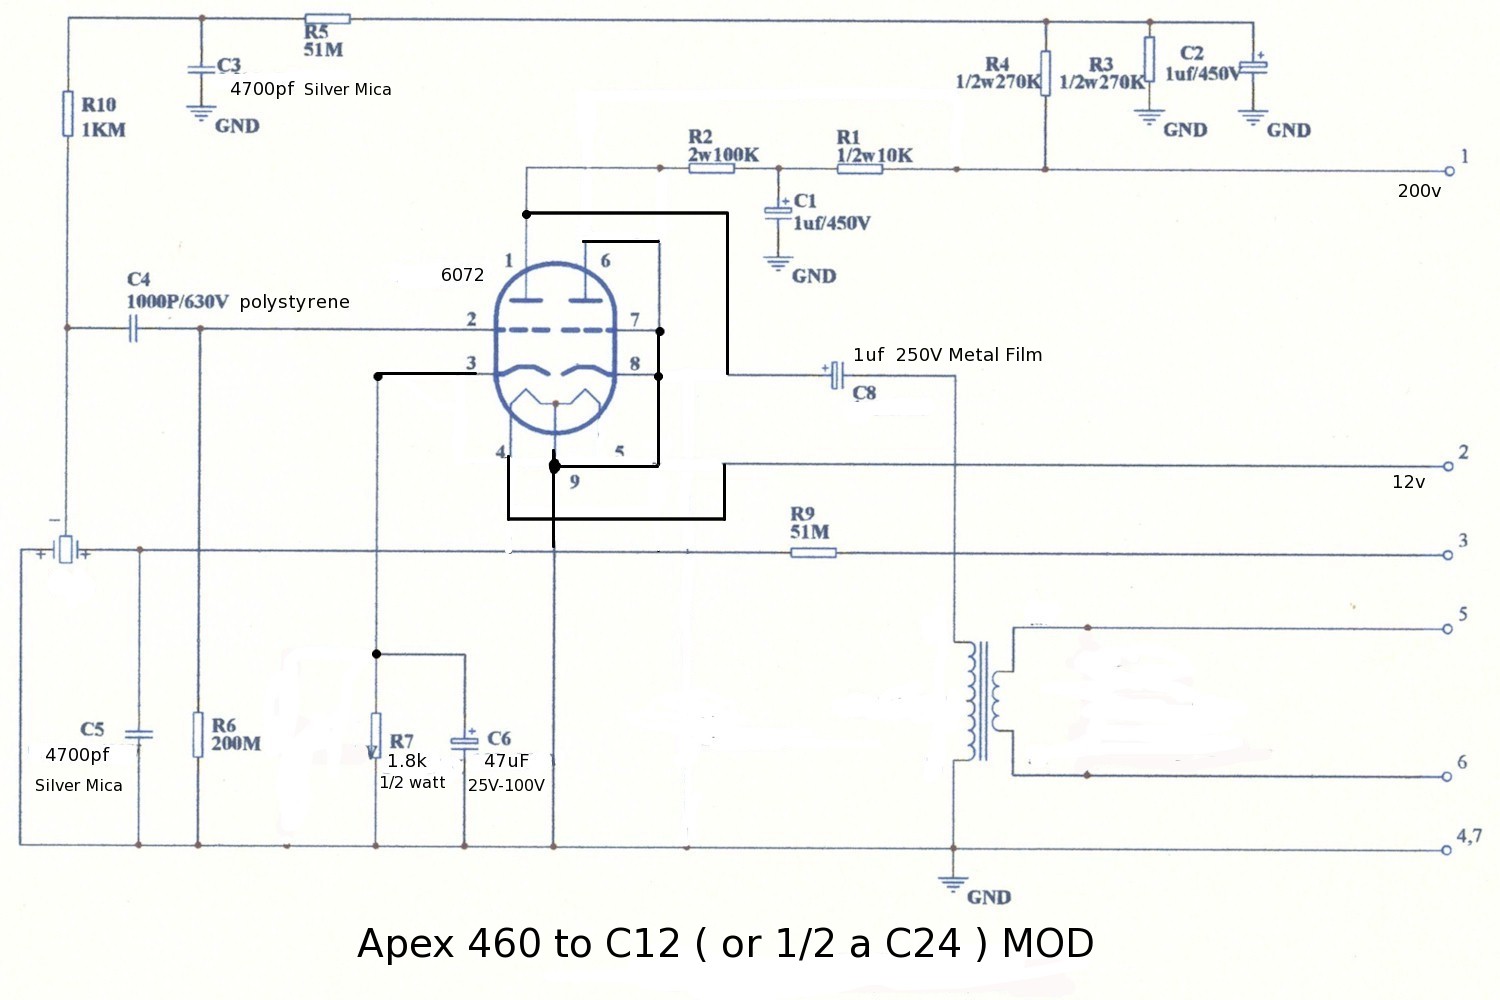
The Original C12 for reference - http://www.mark-o-matic.com/media/AKG-c12.pdf
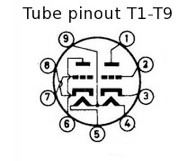
Tube Pinout Guide - The tube pins are counted looking at the bottom of the tube counting clockwise, or looking at the lug ( or solder ) side of the tube socket.
V. Step By Step Instructions -
Here is the script I used.
First Open and remove the tube and disconnect the circuit boards so you can get at the components. If your careful this entire mod can be done without major disconnections of other components. Its a REALLY good idea to take lots of pictures at this point so if something comes loose you know where it should go.
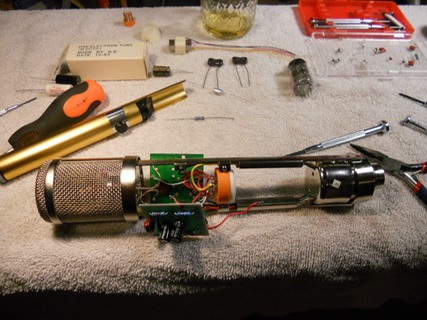
Pix - Opened Up - Click Here for Full Size
Some Disassembly -
Remove C7
Remove R8
Remove C9
Remove C10
Remove Wire at T6 ( remove the whole wire )
Remove Wire at T7 ( remove the whole wire )
Remove wire at T8 and place on T1
Remove Wire at T5 ( remove the whole wire )
( NOTE - if there are other wires on the other end opposite the tube connector besides the one you are removing, leave them be - remove only the single wire )
Now Some Assembly -
Wire T6, T7, T8 to T9 ( ground ) T9 will already have a wire to ground. I used a lead wire from another old component and soldered T6 first, then laid the wire across the other connectors and soldered.
Change R7 to 1.8K ohm
Change C8 to 1uf film
Change C6 to 47uf Nichion Muse or Elna Cerafine
I found it easier to remove both C8 and C6 then put C8 in first, followed by C6. I used heat shrink on the leads of the caps to prevent cross connections, and to avoid more solder points by connecting additional wires like I’ve seen in other mods. Its always good to keep the leads as short as possible, but when using big components in a tiny space, you have to do what you can to get it to fit. The curve of the round casing is fairly limiting at the edges, so be sure to test fit.
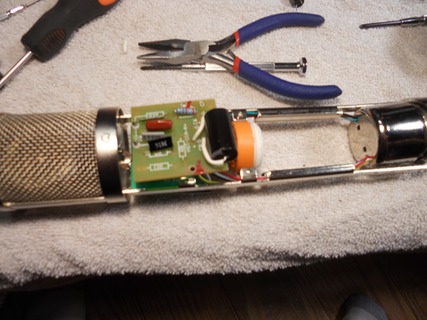
PIX - C8 Cap in Place - CLICK HERE FOR FULL SIZE
Change C3 to 4700pf
Change C5 to 4700pf
Change C4 to 1000p polystyrene
C4 is on the back side of one of the circuit boards. It connects to one of the leads from the capsule so it may be easier to replace this after the Capsule swap out.
TEST OPPORTUNITY - you can test at this point if you’d like. Since I had it open already I went ahead and did the capsule first.
Replace Capsule with C12 type
There are tons of guides on this on the internet. Google is your friend, but its pretty basic. Just be sure to check which wire is the front and back of the capsule and where that originally hooked up before removing. Pull out the old capsule and change the mount and put the new capsule in.
TEST OPPORTUNITY - I tested at this point, only I used the old tube just in case I had wired something wrong ( NOS tubes are not cheap ). I initially got no sound but had wired the capsule wrong somehow so I reiterate the importance of taking pictures of everything before disassembly. That combined with some schematic tracing quickly found my problem and it was no big deal. I was stoked that it worked but alas too anxious to get the whole thing done to do clips at this point. opened it back up and went for the transformer.
Replace transformer with Cinemag CM2480
I found another online guide as a reference when doing this as well as there are several. The one I used however Im pretty sure had the phase inverted by swapping the output wires. Not a big deal for single sound source but can cause big issues with multiple mics and sound sources if some are wired backwards. Here are the connections I used.
Cinemag - Old
Red - Red
Brown - White
Yellow - Green
Orange - Black
Again I used heat-shrink instead of tape or additional wires.

Pix - Transformer - CLICK HERE FOR FULL SIZE
Reassembly to the final product
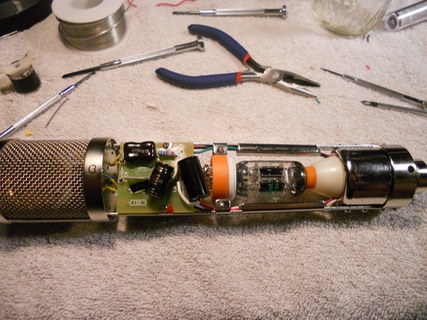
PIX - NOS Tube installed - CLICK FOR FULL SIZE
The Back Side
PIX - The Back Side - CLICK HERE FOR FULL SIZE
VI. CLIPS ! -
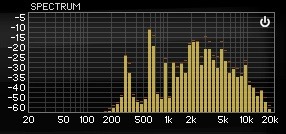
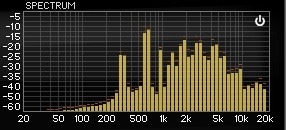
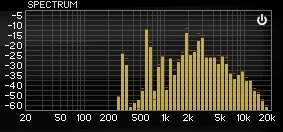
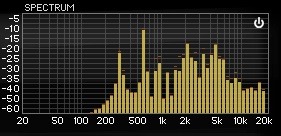
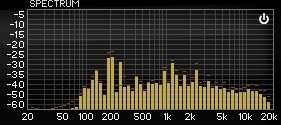
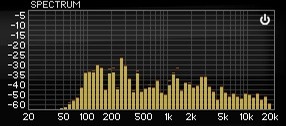
Ive been basted before on my testing techniques, but hey they work for me. I do my best to keep sameness. One of the mistakes I made in this round was I didn't let the tube warm up properly and the first take of the mod in cardioid wasn't right. I looped similar sections as best as I could and provided spectrum shots as well. They may be useless but I find them interesting at least. ( is that what Chinese hyped looks like ? ) Overall I say they show me a lot more air when the proximity effect is happening, and overall flatness and better bass response.
I’ve been using the same vocal line from “Landslide” and same guitar thing ( in not much of a guitar player ) as well for testing for a long time so there are a few people will be real sick of hearing these but it gives me a lot to compare to over time as well.
Cardioid Vocals -
http://www.mark-o-matic.com/media/Apex460-Stock-Card-Vocals.wav
C12 MOD
http://www.mark-o-matic.com/media/Apex-C12Mod-Card-Vocals.wav
Figure 8 Vocals
Original Apex 460
http://www.mark-o-matic.com/media/Apex460-Stock-Fig8-Vocals.wav
C12 Mod
http://www.mark-o-matic.com/media/Apex-C12Mod-Fig8-Vocals.wav
Cardioid Acoustic Guitar -
Original Apex 460
http://www.mark-o-matic.com/media/Apex460-Stock-Card-Acoustic.wav
C12 Mod
http://www.mark-o-matic.com/media/Apex-C12mod-Card-Acoustic.wav
UPDATE #1 -
These recordings were done with a Focurite Voicemaster Pro using the SPDF out ( only the pre was activated - no effects ) . Its the only non-tube pre I have of decent quality. Tonight while doing some critical listening I can hear with headphones that there is a slight “something” on the high end, which Im assuming is the A/D converter. I find the Focusrite to be a little sterile, not my first choice on a real recording ( though some of their higher end pres are very nice I hear ) but its probably perfect for testing for a no-added-color test which i’ve used it lot for.
Female Vocals -
I had a request for Female vocals on the C12 mod. Since I obviously don't have the original to compare to any more - I decided to compare to a Blue Blueberry which was designed with female vocals in mind.
Female Vocalist #1 - Sue McCaleb
C12 MOD - http://www.mark-o-matic.com/media/sue-c12.wav
Blueberry - http://www.mark-o-matic.com/media/sue-bb.wav
These next two clips were done on an Aphex 107. At the risk of driving up e-bay prices ( because I’d like another one as a spare ) I think this is the best low end pre of the “starved plate” design. There is not a lot of love for starved plate designs, but this pre has all WIMA caps and some high end components, plus the tube will last forever. It has the least amount of “tubie-ness” of my other pres, and so I have used it for testing too. Tube is a new stock Jan Phillips.
Female Vocalist #2 - Paulita
C12 MOD - http://www.mark-o-matic.com/media/paulita-c12.wav
Blueberry - http://www.mark-o-matic.com/media/paulita-bb.wav
UPDATE - 20131107
I didn't cover the capsule replacement becasue there ar lots of other sites that offer good instructions there.
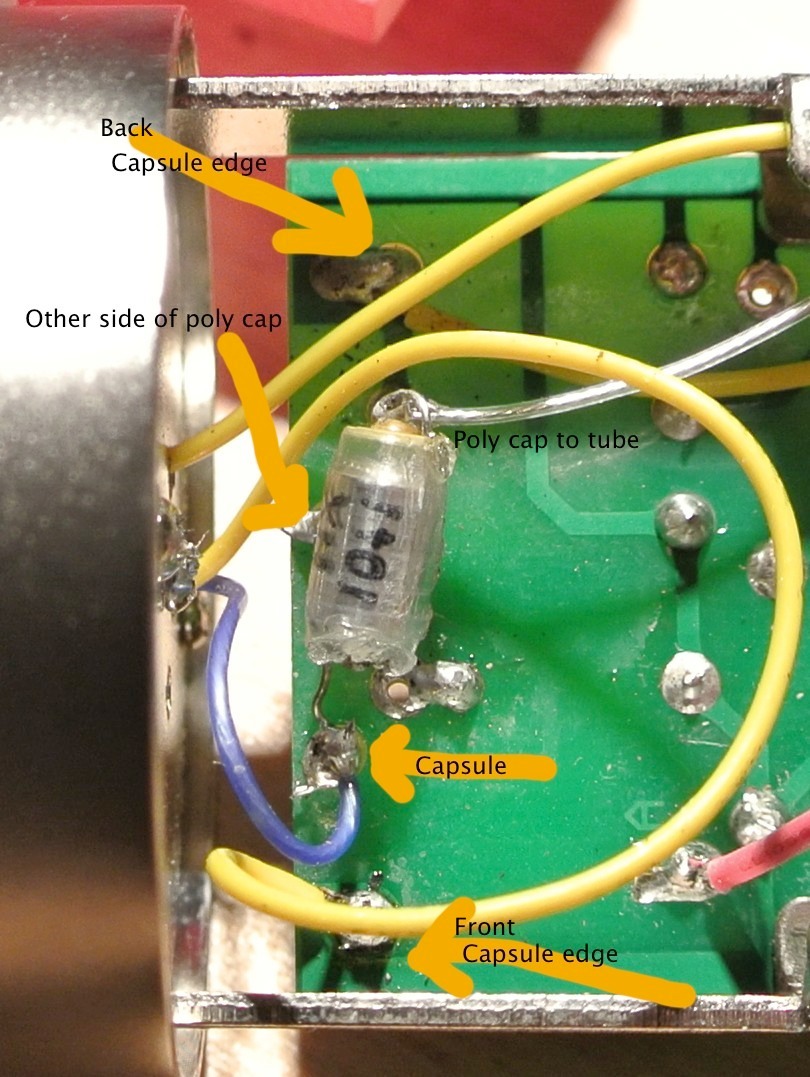
The most common issue with the capsule swap is when you have the old capsule out .. wait a minute .. where did those wires go again ?
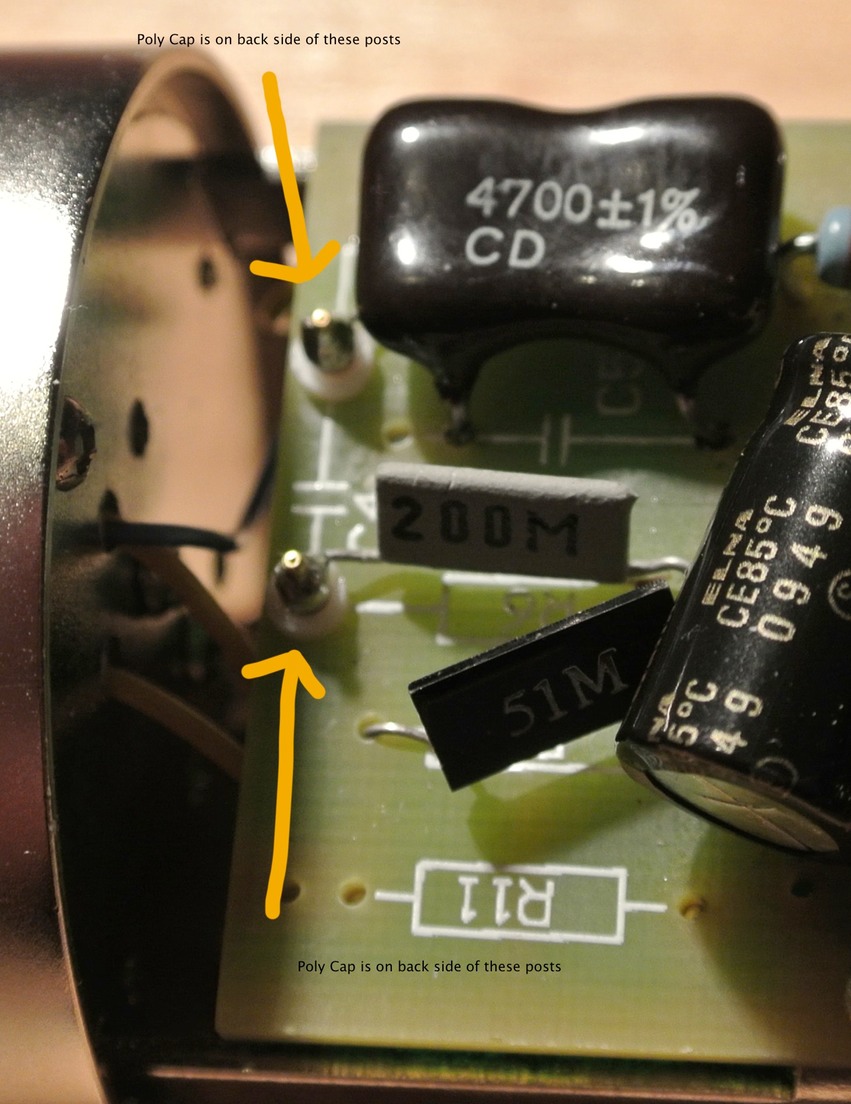
Here is a shot of the board where the capsule gets wired in. This was my first build and notice I melted the plastic on the poly cap a little, try not to do that. Working in tiny spaces takes practice. The capsule edge wires (typically yellow in this shot with the AK-12 but will be grey with the RK-12) go to the outer points. The center capsule wire goes to one side of the Poly cap. A common mistake is to connect that wire to the wrong side of the poly cap. The other side of the poly cap goes back to the board AND to the wire that goes to the tube grid. Note - use of a silver wire here to the tube makes a big difference. Some of the Apex mics I have seen already have a silver wire in that location.
On a side note - the stock Apex capsule is not half bad, at least in comparison to other Chinese capsules I've experimented with. It is not an edge terminated design like a C12 capsule, so if your going for the C12 sound its important to swap the capsule. Save the old capsule to use in something else though. I put mine into a MXL V67G along with a similar output cap setup, with no other changes, and was really surprised ot how much better that mic sounded compared to the stock MXL capsule/cap. You can leave the back side of the capsule unterminated, or see the V69 mod page on this site for the section where I added a switch to that mics capsule setup for an Omni selection.
Here is the other side of the same board. The poly cap goes in between the two posts with the white spacers. The spacers are important to remove mechanical noise from the capsule wires.